
This is part 2 of our primer series for engineers who run containers on industrial systems. New to the series? Start with the introduction, You Don’t Need to Be a Developer to Run Containers Well, and Git for Non-Developers: Primer 001.
Audience: Engineers who manage container deployments with Portainer and Docker on industrial and critical systems.
Goal: You build an OCI-compatible image from a Dockerfile, test it locally, tag it, and push it to a remote registry. Portainer can then use the image from a stack or a later GitOps workflow.
This primer uses the Go application in nrxlab/opto-portainer-demo as the example. It shows the minimum process needed to build and publish an image. A later primer will cover automatic image builds and GitOps updates from repository changes.
Why build an image at all? Every container deployment runs from an image. You build your own when a published image does not contain your application, when the runtime layout must be fixed inside the artifact, or when your security policy requires a base image that you select and track yourself. A self-built image turns your application and its dependencies into one versioned artifact: the same Dockerfile produces the same result on a laptop, a build server, and a managed industrial device. The registry is then the controlled hand-off point between the system that builds the image and the systems that run it.
1. Image, container, and registry
An image is a versioned package of filesystem layers and metadata. A container is a running process created from an image. A registry stores and distributes images.
Docker image formats follow the Open Container Initiative (OCI) specifications. Docker-compatible registries can store OCI images. The commands in this primer use Docker, but the image can also be used by other OCI-compatible runtimes.
The basic path is:
A tag is a readable name such as 1.0.0 or 2026.09.22. A digest is a content address such as sha256:.... Tags can move. A digest identifies one exact image manifest.
1.0.0 previously pointed to image A and now points to image B. Each image's digest is fixed and cannot move.Considerations:
- Use a release tag for a release that must be traceable.
- Do not use
latestas the only production reference. - Record the image digest when the deployed image must be reproducible.
- Do not put API keys, passwords, certificates, or
.envfiles in the build context.
2. Install and check the local tools
Linux
Install Docker Engine by following the Docker Engine installation guide. Use the installation instructions for the distribution. Do not mix packages from different Docker installation methods.
Windows
Install Docker Desktop and enable the Linux container engine. Use PowerShell or Git Bash for the commands in this primer.
Check the tools:
# Show the Docker client and server versions.
docker version

# Show the Buildx plugin version.
docker buildx version

# Show the active builder and supported platforms.
docker buildx ls
The docker command is the Docker client. buildx uses BuildKit to build images and can publish multi-platform image indexes.
Considerations:
- On Linux, the current user must have permission to access the Docker daemon.
- On Windows, Docker Desktop must be running before a build.
- A local build normally targets the host architecture. Check the target before you publish an image.
3. Get the example project
Clone the example repository:
# Download the example project.
git clone https://github.com/nrxlab/opto-portainer-demo.git

# Enter the project directory.
cd opto-portainer-demo
The build context is the directory passed as the final argument to docker buildx build. In this example, . means the current project directory.
Review the files before you build:
| File | Purpose |
|---|---|
Dockerfile |
Defines the image build stages and the final runtime process. |
go.mod and go.sum |
Define the Go module and its dependency checksums. |
cmd/ |
Contains the application source. |
.env.example |
Documents runtime settings. It is not a secret store. |
compose.yml |
Defines the example collector and MQTT broker deployment. |
.dockerignore |
Reduces the build context and excludes local files. Add one before a production build. |
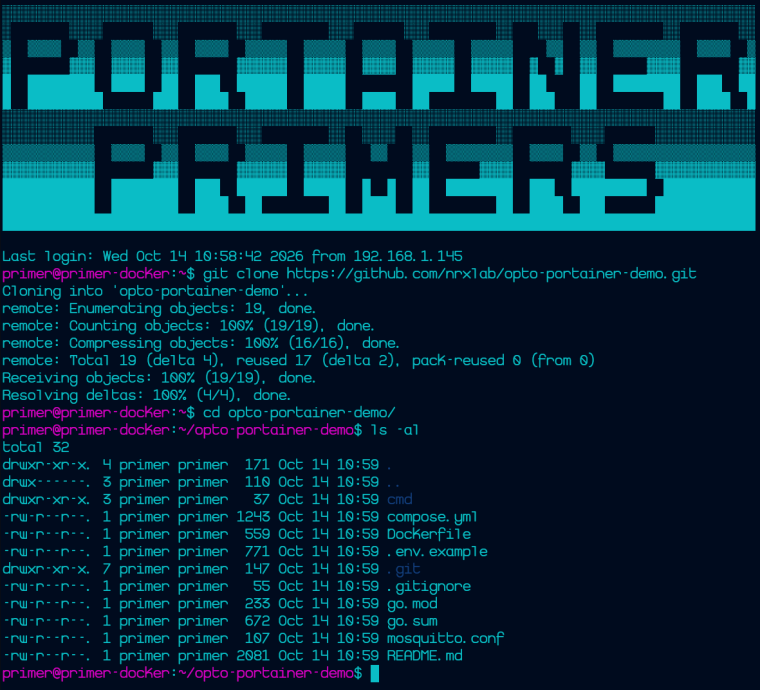
Dockerfile, compose.yml, go.mod, go.sum, and cmd/.4. Read the Dockerfile
The example Dockerfile is a multi-stage build:
Note: the blank lines and comments in this example are there to make each step easier to read. Docker ignores them when it builds the image.
# syntax=docker/dockerfile:1

# Build with the native builder platform.
FROM --platform=$BUILDPLATFORM golang:1.24-alpine AS build

# Declare the target operating system and CPU architecture.
ARG TARGETOS
ARG TARGETARCH

# Set the working directory for build commands.
WORKDIR /src

# Copy dependency files before source files to improve cache reuse.
COPY go.mod go.sum ./

# Download Go dependencies.
RUN go mod download

# Copy the application source.
COPY cmd ./cmd

# Compile a static target binary.
RUN CGO_ENABLED=0 GOOS=${TARGETOS:-linux} GOARCH=${TARGETARCH} \
    go build -trimpath -ldflags='-s -w' \
    -o /out/opto-rio-rest-collector ./cmd/opto-rio-rest-collector

# Start a small runtime image with no package manager or shell.
FROM scratch

# Copy trusted CA certificates from the build stage.
COPY --from=build /etc/ssl/certs/ca-certificates.crt /etc/ssl/certs/

# Copy only the compiled application.
COPY --from=build /out/opto-rio-rest-collector /opto-rio-rest-collector

# Run as a non-root numeric user.
USER 65532:65532

# Start the application.
ENTRYPOINT ["/opto-rio-rest-collector"]
Build stages and layers
The first line, # syntax=docker/dockerfile:1, is a parser directive. It must be the very first line of the Dockerfile, before any other comment, blank line, or instruction. If anything comes before it, BuildKit treats it as an ordinary comment and uses its built-in syntax instead. See the Dockerfile reference for parser directives.
Each FROM starts a stage. Each Dockerfile instruction can create a layer or image configuration change. The final image copies only the required files from the build stage.
scratch runtime stage. The toolchain, source, cache, and shell are left behind.The builder contains Go and the source toolchain. The scratch runtime contains no shell or package manager. This reduces size and removes many runtime tools, but the application must be compatible with that limitation.
Important Dockerfile instructions
| Instruction | Meaning and points to think about |
|---|---|
FROM |
Selects a base image and starts a stage. Pin a trusted image by version, and use a digest when the base must be exact. |
ARG |
Defines a build-time value. It is not a safe place for a secret because build metadata and layers can expose values. |
ENV |
Defines a value available when the image runs. Do not use it for secrets. |
WORKDIR |
Sets the directory for later instructions and the runtime process. |
COPY |
Copies files from the build context or another stage. Copy only the files that the stage needs. |
RUN |
Executes a command during the build. Keep package installation and cleanup in a controlled layer. |
USER |
Selects the runtime user. Prefer a non-root user when the application permits it. |
ENTRYPOINT |
Defines the main process. The JSON form avoids an extra shell. |
EXPOSE |
Documents a listening port. It does not publish a host port. |
HEALTHCHECK |
Defines a runtime health test when the image can perform one safely. |
Base image choices
- Vendor or distribution base:
golang:1.24-alpine,debian:bookworm-slim, or a supported RHEL-compatible base can provide tools and certificates. Track its support period and security updates. - Distroless: contains the application and selected runtime files, but normally no shell or package manager. It is useful when the application needs runtime libraries or certificates but does not need administration tools.
- Scratch: contains nothing until the Dockerfile copies files into it. It is suitable for a static binary with all required certificates and data copied explicitly.
- Build from scratch: means starting from
scratch, not compiling without dependencies. Verify certificates, time-zone data, dynamic libraries, and user information before use.
Do not select a small base image only for size. Confirm that it receives security updates and that the application has the files it needs.
Build context and secrets
The build context is sent to the builder. Add a .dockerignore file:
.git
.env
*.key
*.pem
bin/
dist/
Use BuildKit secret mounts for a secret that a build step must read. Do not use ARG or ENV for build secrets. The secret should not become part of an image layer.
5. Build and run the image locally
Build a single-platform image for the local machine:
# Build the image from the Dockerfile in the current directory.
# Tag the local image with a test tag.
docker buildx build --load \
  --tag opto-rio-rest-collector:local \
  .
| Flag | Meaning |
|---|---|
buildx build |
Runs a BuildKit image build. |
--load |
Loads a single-platform result into the local Docker image store. |
--tag / -t |
Assigns an image name and tag. |
. |
Uses the current directory as the build context. |
Inspect the result:
# List the local image.
docker image ls opto-rio-rest-collector

# Show image configuration and layer metadata.
docker image inspect opto-rio-rest-collector:local
The collector requires runtime values such as OPTO_HOST and OPTO_API_KEY. Run it only with values supplied outside the image:
# Provide runtime values without writing them into the image.
docker run --rm \
  --env OPTO_HOST="10.0.2.55" \
  --env OPTO_API_KEY="replace-this-value" \
  --env OUTPUT_MODE=stdout \
  opto-rio-rest-collector:local
Do not put a real API key in shell history. Use an environment file with suitable file permissions or a runtime secret mechanism for repeated tests.
6. Port and environment paths
Container networking has separate layers:
external host port → container host interface → container port → application listener
EXPOSE documents a container port. It does not create a host mapping. A runtime or Compose file maps the host port to the container port.
For the example MQTT broker:
services:
  mosquitto:
    ports:
      - "1883:1883"
The first port is the host port. The second port is the container port. A client outside the Docker network uses the host address and port. A service in the same Compose network uses the service name and the container port, such as mosquitto:1883.
Environment values follow a separate path:
Portainer or Compose value → container environment → application configuration → workload behavior
In the example Compose file:
services:
  opto-rio-rest-collector:
    environment:
      OPTO_HOST: ${OPTO_HOST:?set OPTO_HOST}
      OPTO_API_KEY: ${OPTO_API_KEY:?set OPTO_API_KEY}
      OUTPUT_MODE: ${OUTPUT_MODE:-mqtt}
      MQTT_URL: ${MQTT_URL:-tcp://mosquitto:1883}
${NAME:?message}requires a value and stops deployment when it is absent.${NAME:-default}uses the supplied value or the default.OPTO_API_KEYis passed to the container at runtime. It is not baked into the image.
Portainer environment variables are deployment inputs. The image must read the corresponding names, and the stack definition must pass them to the container. A variable in Portainer does nothing if the Compose service does not pass it through.
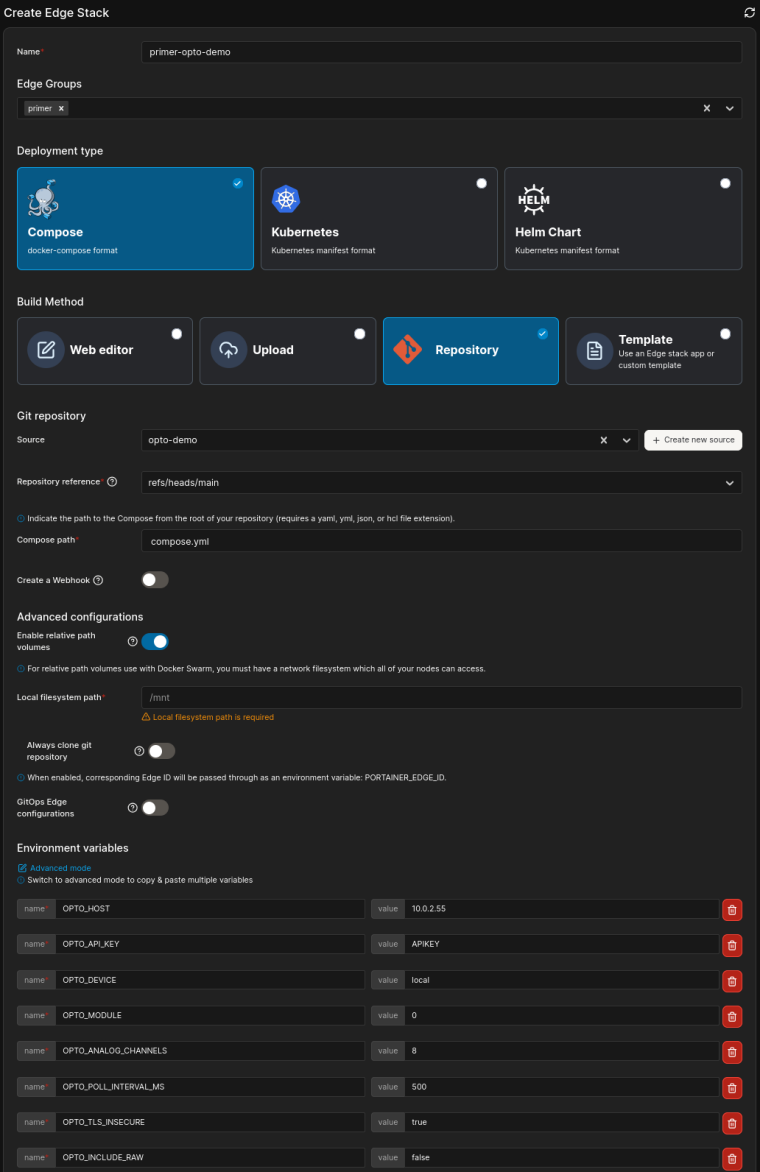
7. Tag the image for a registry
A registry image name has this form:
[registry-host/]namespace/image:tag
Examples:
ghcr.io/your-user/opto-rio-rest-collector:1.0.0
gitlab.example.com/group/opto-rio-rest-collector:1.0.0
docker.io/your-user/opto-rio-rest-collector:1.0.0
quay.io/your-user/opto-rio-rest-collector:1.0.0
Create a release tag and an optional moving channel tag:
# Create a release tag for the exact source revision.
docker image tag opto-rio-rest-collector:local \
  REGISTRY/NAMESPACE/opto-rio-rest-collector:1.0.0

# Create a separate channel tag only when your change process permits moving tags.
docker image tag opto-rio-rest-collector:local \
  REGISTRY/NAMESPACE/opto-rio-rest-collector:stable
Replace REGISTRY/NAMESPACE with a real path. There must be no space after the registry slash. For example:
# Tag the image for Docker Hub.
docker image tag opto-rio-rest-collector:local \
  docker.io/your-user/opto-rio-rest-collector:1.0.0
A tag changes when you publish another image with the same name. Use the digest returned by the registry for an immutable deployment reference.
8. Authenticate to and push to registries
Use the registry hostname in both the image name and the login command. Keep registry credentials outside the image and repository.
GitHub Container Registry (GHCR)
Install the GitHub CLI and authenticate as described in Primer 001:
# Authenticate the GitHub CLI.
gh auth login

# Configure git credentials for GitHub hosts.
gh auth setup-git
For GHCR, use a token with package write permission. The default GitHub CLI login does not include the write:packages scope, so a push with that token fails. Add the scope to the stored CLI token one time:
# Add the package write scope to the GitHub CLI token (one-time per account).
gh auth refresh -s write:packages

# Confirm the granted scopes.
gh auth status
Then pass the token to Docker through standard input and push:
# Request a token from the authenticated GitHub CLI.
gh auth token | docker login ghcr.io --username YOUR_GITHUB_USER --password-stdin

# Push the release tag.
docker push ghcr.io/YOUR_GITHUB_USER/opto-rio-rest-collector:1.0.0
Considerations:
- Confirm that the GitHub account can publish to the package namespace. Do not place the token in the command arguments or in a shell script.
- A personal access token (PAT) with
write:packagesandread:packagesworks in place of the CLI token. Use a PAT when the CLI login flow is not suitable, for example on a build server. - A package that GHCR creates on the first push is private by default. Readers need
read:packagesto pull it, or you must change the package visibility in the package settings. Link the package to its source repository when the repository page should show it. - Section 11 uses this package as a pull source inside Portainer. Portainer only pulls, so it gets a token with
read:packagesand no write scope.
GitLab Container Registry
Use the GitLab CLI or a GitLab access token with the required registry scope:
# Authenticate to the GitLab host.
glab auth login --hostname gitlab.example.com --git-protocol https

# On Linux or macOS, configure glab as the Docker credential helper.
glab auth configure-docker
For a direct login, use standard input:
# Read the token without placing it in the command line.
printf '%s' "$GITLAB_TOKEN" | docker login gitlab.example.com \
  --username YOUR_GITLAB_USER --password-stdin

# Push the release tag.
docker push gitlab.example.com/GROUP/opto-rio-rest-collector:1.0.0
Use the registry path shown by the GitLab project. The hostname, group path, and project path must match that project.
Docker Hub
Create a Docker Hub access token. Do not use an account password for automation:
# Log in to Docker Hub with an access token.
printf '%s' "$DOCKERHUB_TOKEN" | docker login docker.io \
  --username YOUR_DOCKERHUB_USER --password-stdin

# Push the release tag.
docker push docker.io/YOUR_DOCKERHUB_USER/opto-rio-rest-collector:1.0.0
OCI-compatible registries
Quay and other OCI registries use the same docker login, docker tag, and docker push pattern. Read the provider documentation for token scope, hostname, namespace, and retention rules.
Self-hosted registry
Harbor is a common self-hosted registry option. It requires more setup and operational care than the Git repository servers introduced in Primer 001. Plan storage, TLS, access control, vulnerability scanning, backups, and garbage collection before production use.
9. Multi-platform builds
A platform combines an operating system and CPU architecture. Common values are linux/amd64, linux/arm64, and linux/arm/v7. Build for the architectures that the target devices use.
Create and select a Buildx builder when the local default builder does not support the required platforms:
# Create an isolated BuildKit builder and select it.
docker buildx create --name primer002-builder --use

# Inspect supported platforms.
docker buildx inspect --bootstrap
Build and publish an image index for two platforms:
# Build for amd64 and arm64, then push the manifest and platform images.
docker buildx build \
  --platform linux/amd64,linux/arm64 \
  --tag ghcr.io/YOUR_GITHUB_USER/opto-rio-rest-collector:1.0.0 \
  --push \
  .
| Option | Meaning |
|---|---|
--platform |
Selects the target platforms. |
--push |
Publishes the result directly to the registry. A multi-platform result is not loaded into the classic local image store. |
--tag |
Names the image manifest. |
The example Dockerfile builds Go with TARGETOS and TARGETARCH. BUILDPLATFORM prevents the Go compiler stage from running under emulation when a native builder can compile the target binary.
Considerations:
- Confirm that every base image supports every requested platform.
- Test each architecture on suitable hardware or emulation before deployment.
- QEMU emulation can be slower and can hide architecture-specific behavior.
- Docker Desktop and remote builders can provide different platform support. Read the Docker multi-platform build documentation.
- Build services can perform multi-platform builds when local builders are not suitable. GitHub Actions, GitLab CI/CD, Docker Build Cloud, and other paid services require separate credentials, runners, and cost controls.
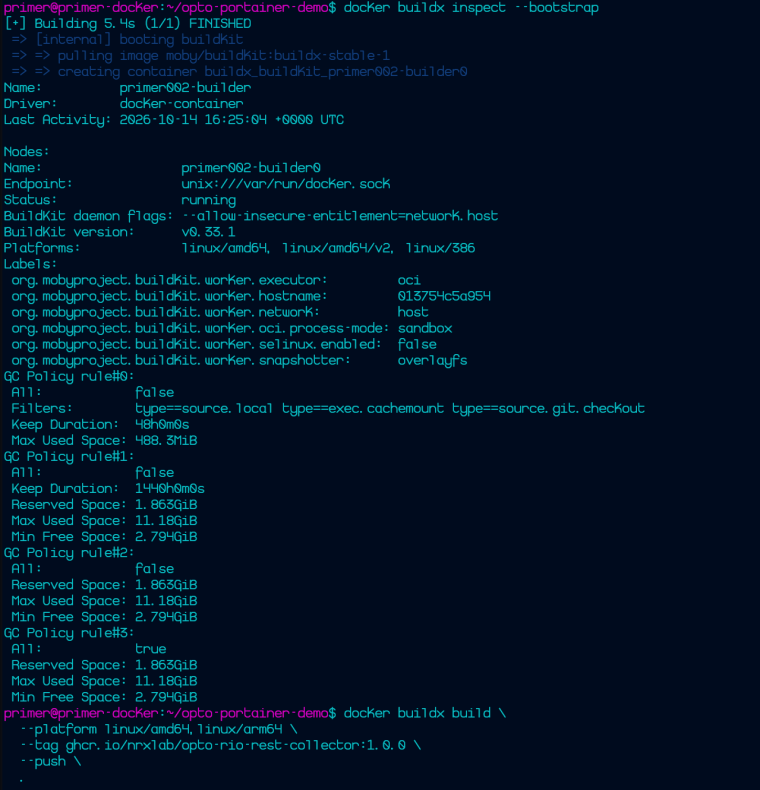
docker buildx inspect --bootstrap showing the selected builder and its supported platforms, followed by a multi-platform build and push.10. Release tags and future automation
Use a predictable tag policy:
1.0.0       immutable release intent
1.0         compatible minor-release channel, if maintained
stable      approved deployment channel, if maintained
sha-<commit> exact source reference, when supported by the process
Do not overwrite a release tag. If the image changes, publish a new release tag. Record the source commit, Dockerfile revision, base image digest, build platform, image digest, and scan result with the release record.
A later primer will cover a Git repository workflow that builds and pushes the image after an approved source change. This primer stops at a pushed registry image that Portainer or another runtime can consume.
11. Add the registry to Portainer and verify a pull
Portainer must authenticate to a private registry before a target environment can pull from it. Register the registry one time, then reference it from stacks and containers. See the Portainer documentation for registries. Also confirm the GitHub/GHCR visibility setting for the pushed package (image). Packages can also be linked to a repository on GitHub. See GitHub's documentation on working with the container registry.
Add GHCR as a registry
- In the Portainer sidebar, select Registries, then Add registry.
- Select the GitHub provider. Portainer sets the hostname to
ghcr.io. - Enter the GitHub username and a personal access token with the
read:packagesscope. Portainer only pulls images, so do not give this token write permission. - Select Add registry.
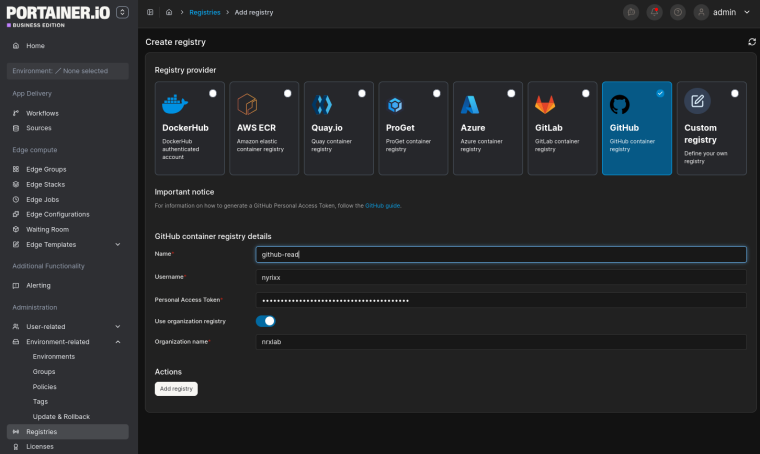
The same pattern applies to the other registries in section 8. Select the matching provider or Custom registry, enter the hostname, and use a read-only token when the provider supports one.
Verify the pull
- Create a test stack or container in the target environment.
- Enter the registry-qualified image reference, for example
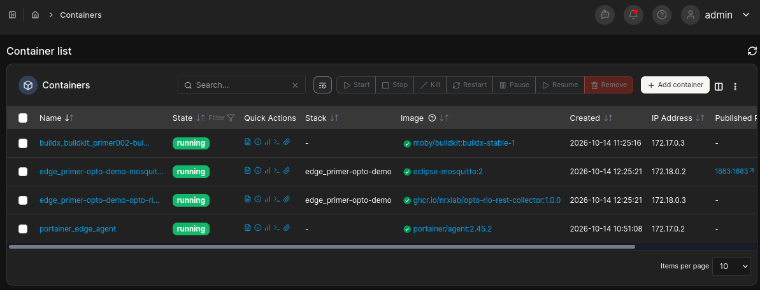
ghcr.io/YOUR_GITHUB_USER/opto-rio-rest-collector:1.0.0, and select the registered GHCR registry for authentication. - Deploy and confirm that the image pulls and the container starts. On the target host,
docker image lsshows the pulled image.
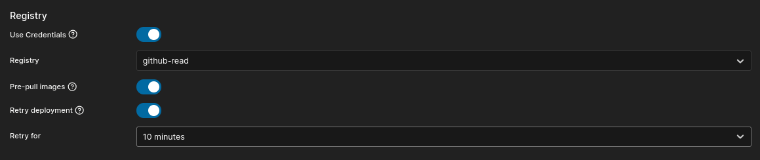
If the pull fails, check three points: the package visibility on GHCR (private by default), the token scope (read:packages), and the registry path. The hostname, namespace, and image name must match the pushed image exactly.
ghcr.io image reference.12. Portainer summary
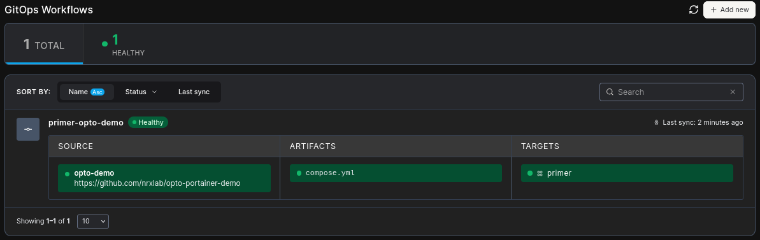
Portainer can use the pushed image in a stack or a GitOps workflow. The stack definition selects the image reference, maps runtime environment variables, and maps host ports to container ports.
The operational chain is:
approved source → image build → registry tag and digest → Portainer stack/workflow → target environment → container process
For industrial and automation systems, keep these controls separate:
- Git records the Dockerfile and stack definition.
- The registry records image artifacts and their digests.
- Portainer records deployment targets, runtime values, and workflow actions.
- The device reports the resulting container state.
Command quick reference
| Task | Command |
|---|---|
| check Docker | docker version |
| check Buildx | docker buildx version |
| grant GHCR push scope to the GitHub CLI | gh auth refresh -s write:packages |
| build locally | docker buildx build --load --tag name:tag . |
| inspect image | docker image inspect name:tag |
| log in to a registry | docker login registry.example.com |
| tag an image | docker image tag source:tag registry/name:tag |
| push an image | docker push registry/name:tag |
| create a builder | docker buildx create --use |
| build for multiple platforms | docker buildx build --platform ... --push ... |